Refreshing your Crevasse Rescue and Snow Belay Knowledge - Part 2
Taking a look at the complexities of setting up a simple pulley sytem in a crevasse rescue situation.
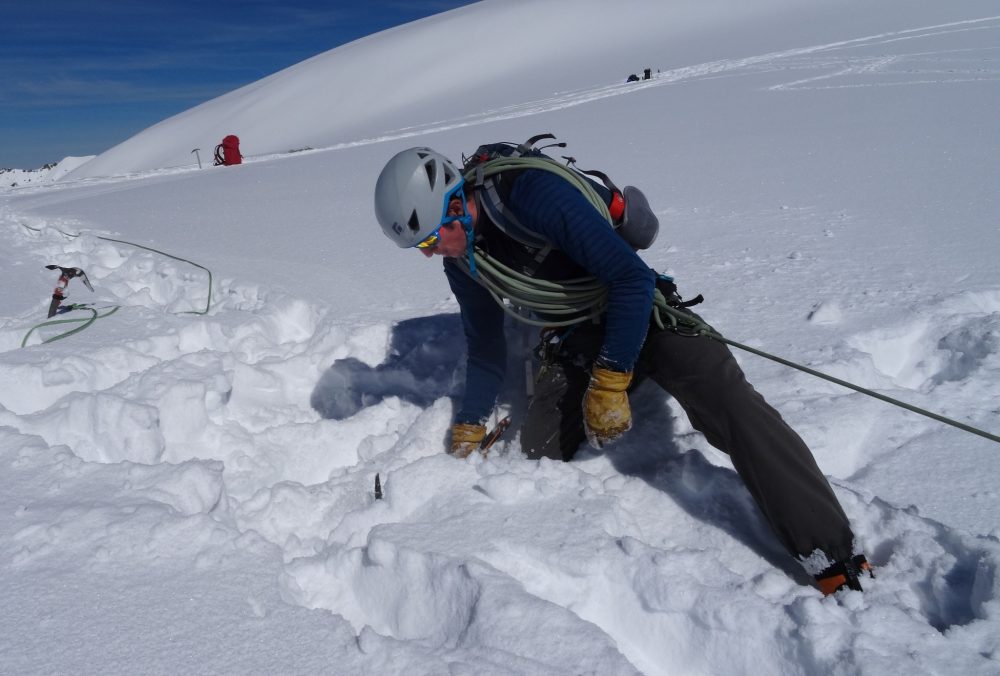
- Once the person's weight comes onto the buried axe and you’re happy with it, then slowly and steadily, shuffle downhill until all the weight comes onto the snow anchor and as you do this their weight will come off of you. At this point you can then start to take off your coils and unravel the rope so that to can leave the snow belay and go to the edge.
- To do this safely, tie a classic prussik onto the ‘live’ rope (which is the rope from your snow anchor to the person in the crevasse) and then clip yourself into the prussik. Slide the prussik down the rope as you now move towards the crevasse edge. This will protect you from falling down another crevasse between the snow anchor and the crevasse the person is in, as well as backing up the snow belay in case it fails.
- By the time you get to the edge of the crevasse, hopefully the person who has fallen into it will have prussik’d up the rope and be near the lip and just need a small amount of help getting over the lip and out. Prussiking up a rope to get out of a crevasse is by far the best and safest way to get out. Hanging from a rope, getting into a position to prussik and then prussiking up a rope is a great skill to practise and can be done at a crag or anywhere you can drop a rope down safely.
- If not, then you can think about helping them out by using a simple 3:1 pulley system.
- You can see from the diagram below, that the weight of the person down in the crevasse is held by the snow anchor that you’ve constructed.
- The rope is locked, and the person's weight in the crevasse is held through either a Ropeman or a Micro Taxion (a mechanical camming/friction device) – using friction, the mechanical camming device locks the rope being pulled in one direction but when the rope is pulled in the opposite direction, the cam releases and runs freely.
- Now, attach a ‘classic’ prussik to the ‘live rope’ (which is the rope from your snow anchor to the person in the crevasse) and then clip yourself into that prussik - this will protect yourself and the anchor as you walk towards the edge of the crevasse.
- Then with one hand, pick up a strand of unused rope that you were carrying as coils, and then with the other hand, slide the ‘classic’ pussik down the live rope walking towards the crevasse taking that unused strand of rope with you.
- Once at the edge of the crevasse, tighten the classic prussik, clip a screwgate karabiner into the prussik loop and then clip the unused strand of rope you have in your other hand into that screwgate karabiner. You have now created a ‘Z’ shape with the rope.
- To reduce the friction in this simple 3:1 system, you can also attach a pulley at this point by hooking the pulley over the rope and then clipping the pulley into the screwgate karabiner rather than just clipping the rope directly to it - this helps greatly to reduce the friction and make it much easier to lift the person weight out over a crevasse.
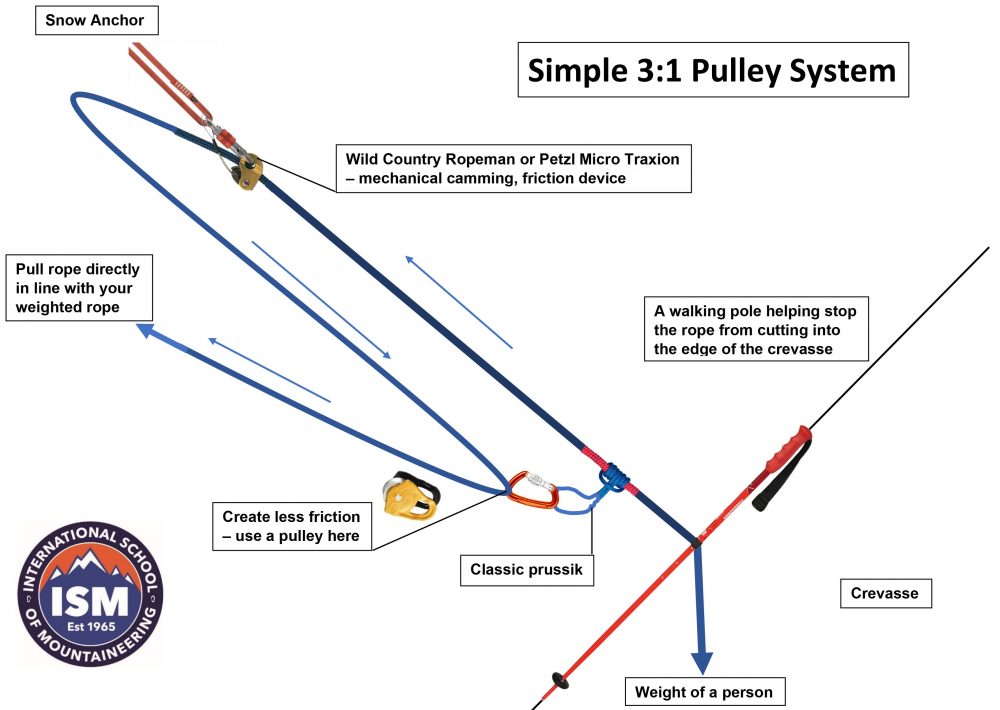
- Now, before you start pulling the unused end of rope, you’ll need to pad out the lip of the crevasse in some way. If you don’t, the rope will act like a saw and will cut a deep, narrow groove into the snow lip, making it extremely hard to pull the person out over it. The easiest way to do this is by using either a walking pole or maybe a backpack to wedge under the rope to help prevent against this happening.
- Once this has been done, take the slack out of the unused end of rope so that you can see the ‘Z’ shape.
- Now, close to where the rope is clipped into the screwgate karabiner and classic prussik, tie a ‘clove hitch’ in the rope and clip that to the central loop of your harness.
- Face as if you were laying face down in the snow with one leg either side of the live rope, take up the tension in the rope by kicking in your front-points giving maximum purchase and drive through the legs as you walk back towards the snow anchor that you’ve constructed.
- We do this as it’s a lot more efficient and uses less effort that just pulling the rope with your hands and arm muscles.
- To help even further, you can use your arms as well, by grabbing the rope that runs from your snow anchor back down to your classic prussik and pulling down hard on this rope as you walk, kicking into the snow back towards your snow anchor.
- One key point to mention here is that as you start pulling you must pull the rope up directly in line with the live rope so not to upset your snow anchor and you must keep your eye on the snow anchor so that you can observe even the slightest of movement and can then stop and do something about it – your snow anchor is THE most important link in the system and so always keep an eye on it!
- As you walk back, the person's weight in the crevasse will be lifted. Once you get to the snow anchor and have run out of space to pull the classic prussik up any further, slide the classic prussik back down the rope towards the crevasse edge and repeat.
- Be aware that crevasses have a lip on the edge. If the rope has cut into that edge at all and you keep pulling and pulling, the person will eventually get jammed up against the lip, and then what you’re in effect doing is trying to pull them through the lip rather than over it.
- With this in mind be aware where the person is, and as soon as they’re close to the lip top, go to the edge and physically just help them over it, or carefully dig around the rope to create an exit for them. If you use the adze on your ice axe to dig, be incredibly careful not to hit the tight rope!
The whole process does need some instruction and coaching, as there as many elements to it, safety issues to consider and a huge amount of judgement needed.
It’s important to practise arresting a fall, making snow anchors and understanding how all the final elements around creating a simple 3:1 pulley system to help your climbing partner safely out of a crevasse fit together. Once understood and practised, these skills will give you so much more confidence to travel and explore mountain glaciated terrain in the future and be able to make a difference in a crevasse rescue situation.
ISM teaches these elements and much more on our Level 1 - Summits & Skills 4000m six-day instructional course, which is a great foundation to summer alpine mountaineering.
If you need a refresher, then also check out our Level 2 – Classic AlpinISM instructional course.
Adrian Nelhams
Related News Articles
ISM Virgin Peaks Expedition 2024 - Tien Shan Kyrgyzstan
ISM trip report of our trip into a very remote part of the Tien Shan Mountains, Kyrgyzstan
Read Article
Getting Into & Developing Your Climbing
Indoor bouldering is a great place to start if you want to try climbing for the first time. You can…
Read Article
ISM Virgin Peaks Expedition 2023 – Tien Shan Kyrgyzstan
ISM trip report of our trip into a very remote part of the Tien Shan Mountains, Kyrgyzstan.
Read Article
Kyrgyzstan Faces 2022
This year ISM celebrated 25yrs of expedition climbing in Kyrgyzstan, with a fantastic trip to the Fergana Range in the…
Read Article
